🧭 Lead a seminar
Open a seminar — Before it starts
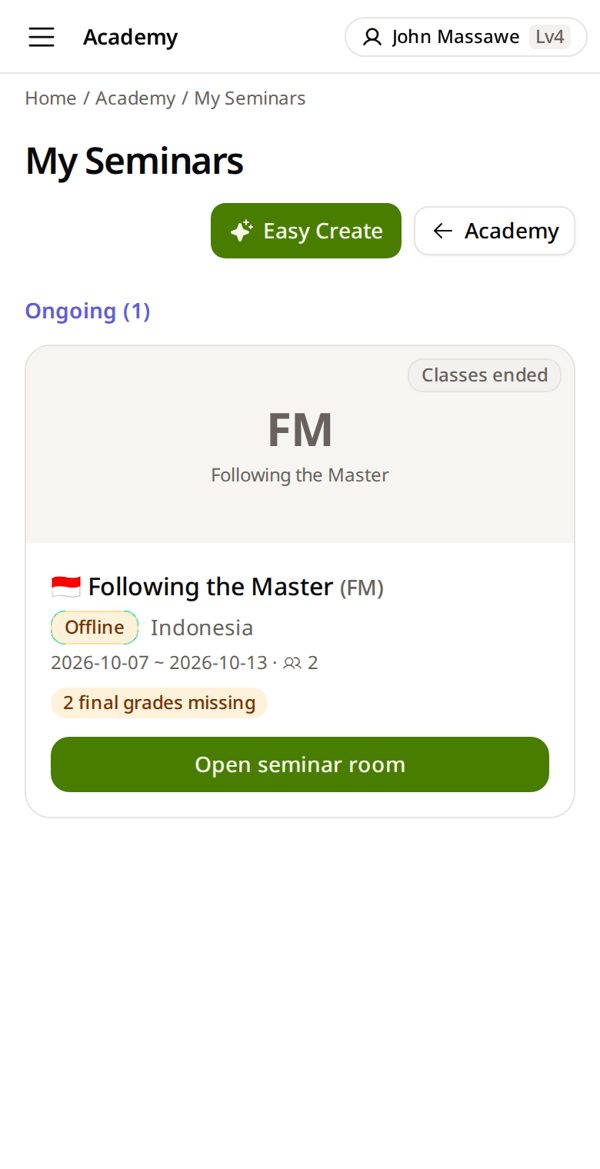
1. Academy → My Seminars → Easy Create
Academy is a big tile on your home page. Ten short questions open your seminar.
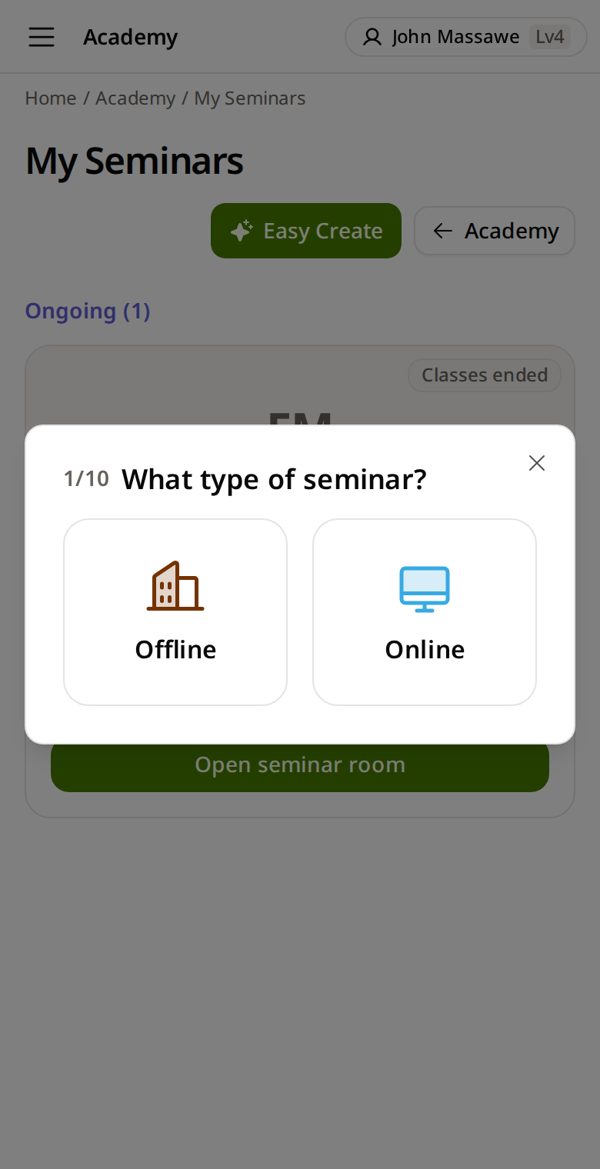
2. In person? Tap Offline
From home? Online.
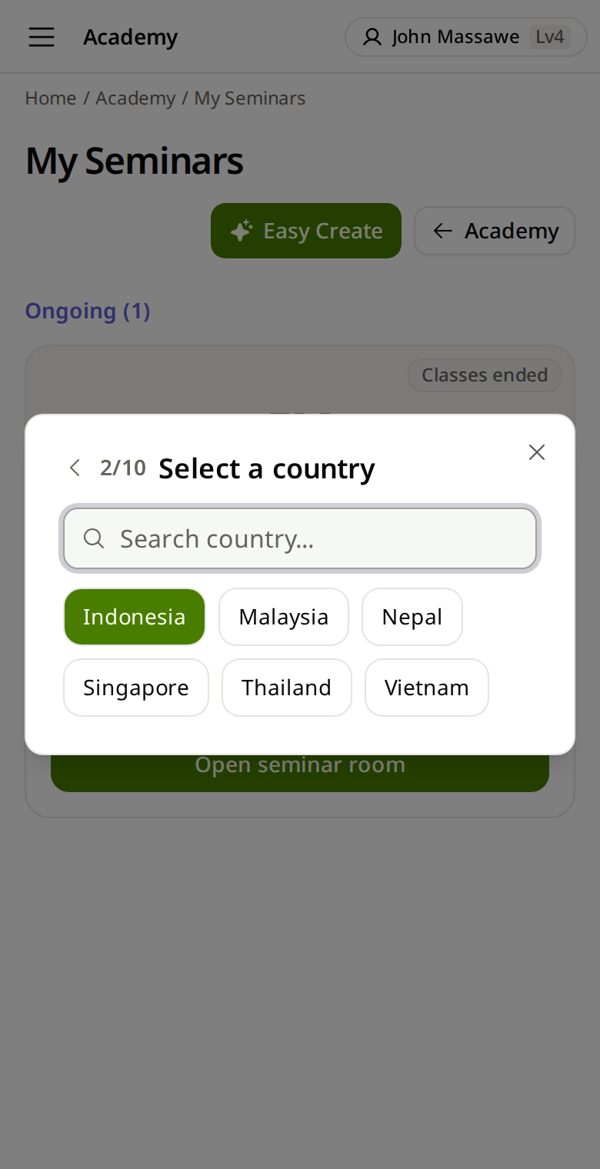
3. Pick the country of the seminar
Your own country is at the top. Teaching in a neighbour country of your branch? Pick it here.
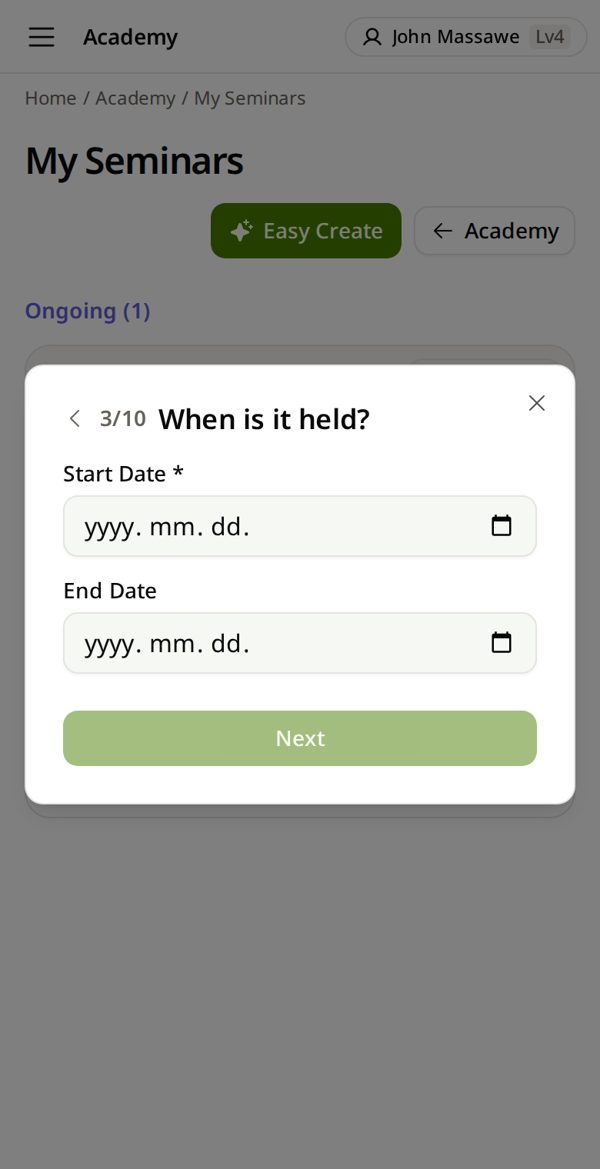
4. Pick the start date → Next
The end date too, if you know it.
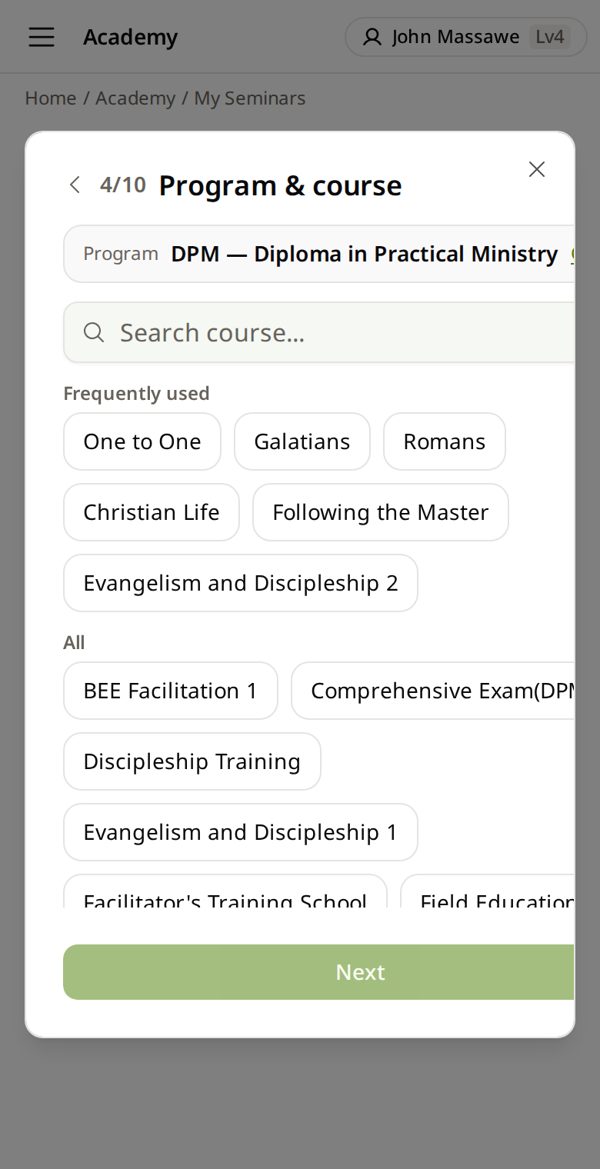
5. DPM → your course
DPM = Diploma in Practical Ministry. Then your course and the language.
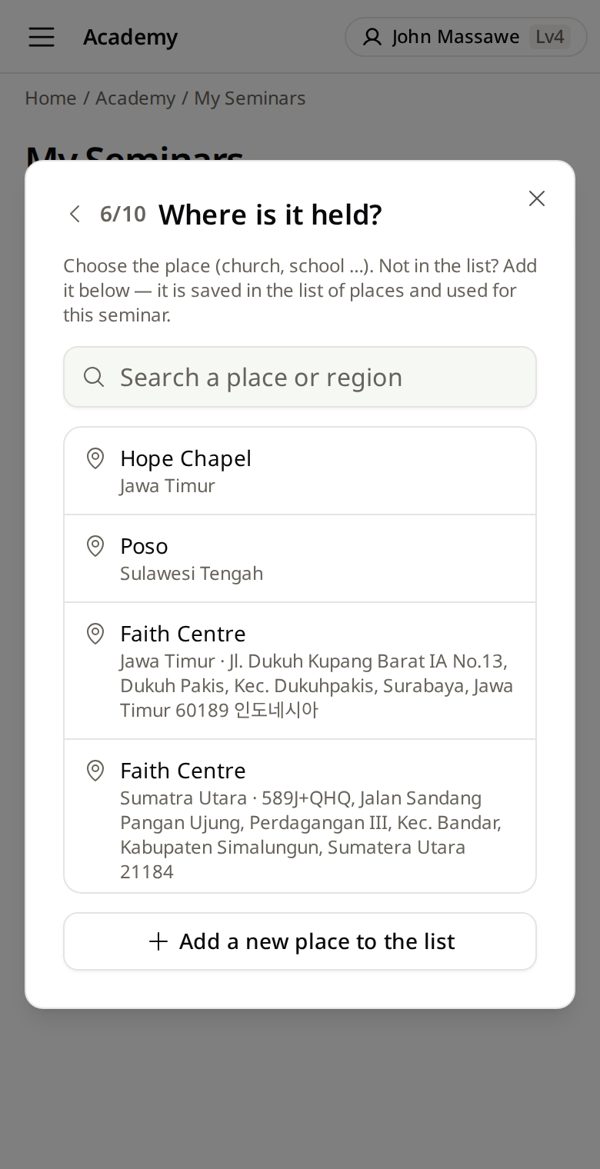
6. Choose the place
Not in the list? Add a new place to the list at the bottom.
7. Group → fee → you → Create seminar
Tap Next after each. Group: skip if none. Fee: your country's usual fee. Facilitator: your name is already there.
A free seminar? Only a coordinator can open it.
Review ✳
Which group? (optional)No groupSeminar feeYour country's usual feeWho will facilitate?+ MeCreate seminar
Add students — Search, approve, or make a new login
1. Academy → My Seminars → tap your seminar
Academy is a big tile on your home page. Your seminar room has everything for this seminar.
2. Type the name → Search → Add
Search shows people in your country. Found? Tap Add.
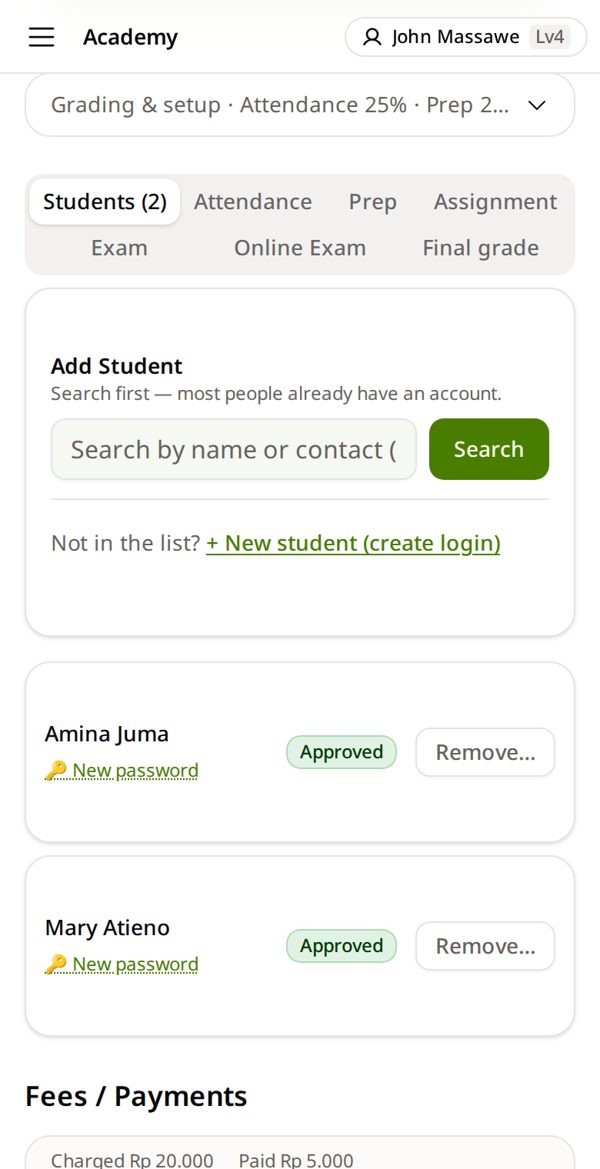
3. Applied by themselves? Approve
They are at the top of the Students tab.
Students ✳
Applied by themselves — waiting for your approvalGrace AchiengApprove · Reject4. No account? + New student (create login)
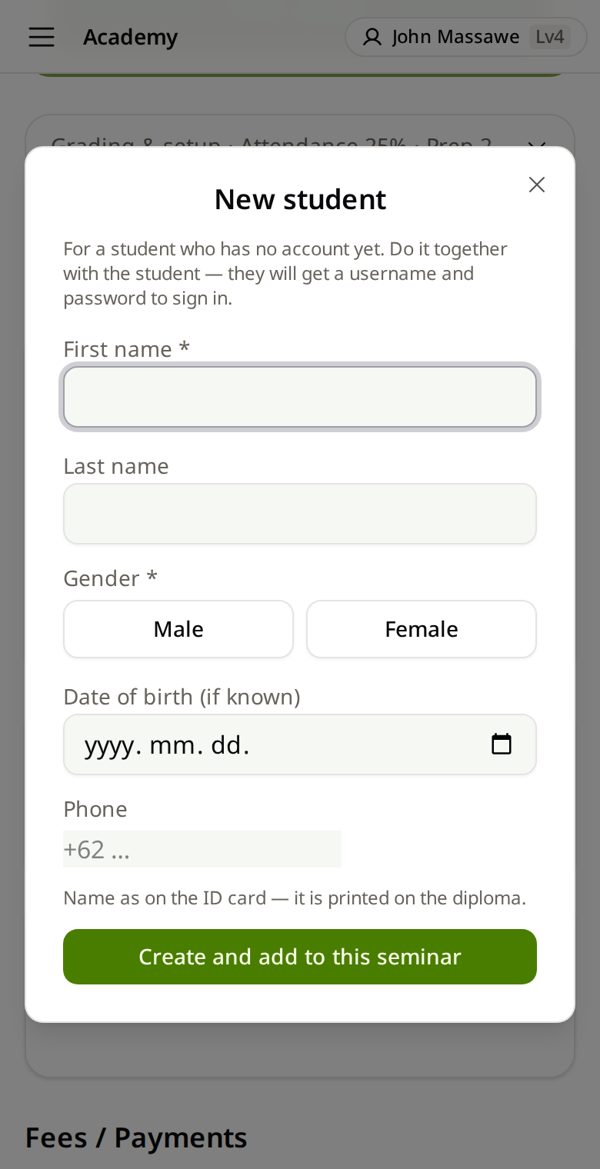
Do it together, with the student beside you.
5. Name as on the ID card → Create and add to this seminar
The student writes the username and password down now — it is shown only once. Missed it? Tap New password on their card.
Attendance — Every lesson, the same day
1. Academy → My Seminars → tap your seminar
Academy is a big tile on your home page. Your seminar room has everything for this seminar.
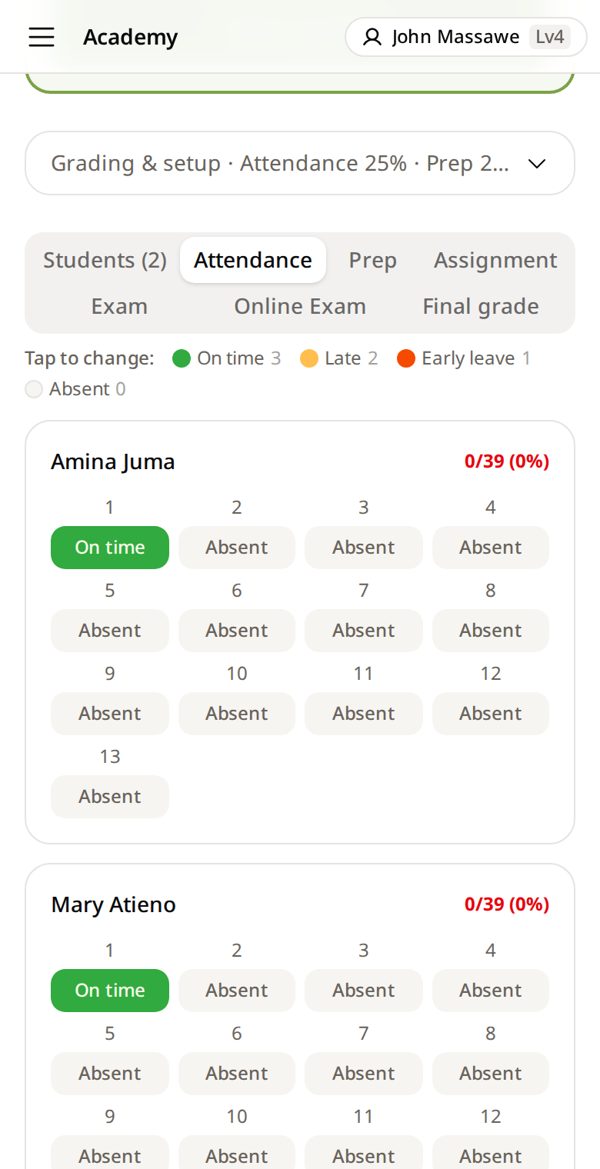
2. Tap Attendance → tap the box
One box per lesson (1, 2, 3…). Each tap changes it: Absent → On time → Late → Early leave. It saves by itself.
A red message = not saved. Check the signal and tap again.
Student fee — Record money the day you get it
1. Academy → My Seminars → tap your seminar
Academy is a big tile on your home page. Your seminar room has everything for this seminar.
2. Scroll to Fees / Payments → Record fee
On the student's line.
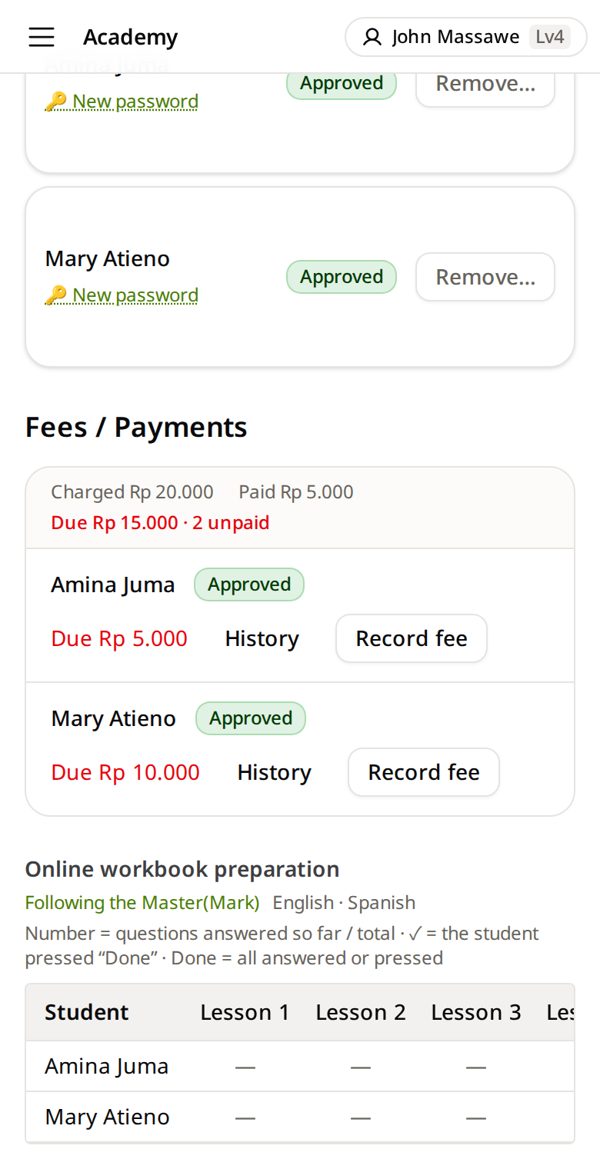
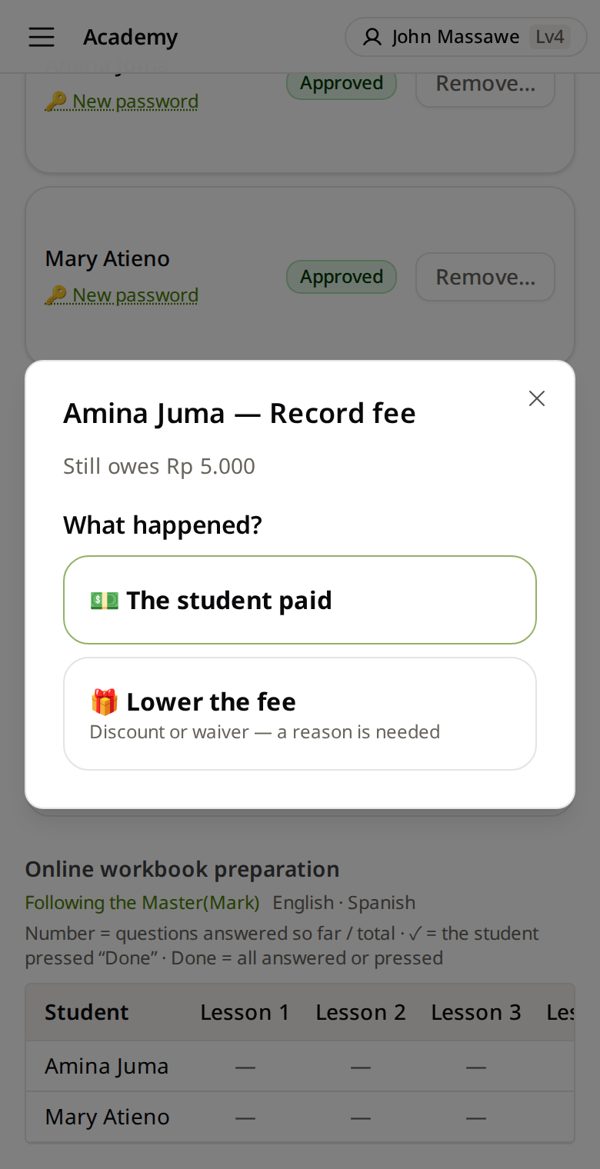
3. What happened? → The student paid
Typed a wrong amount before? Choose I typed a wrong amount instead — it fixes your own line.
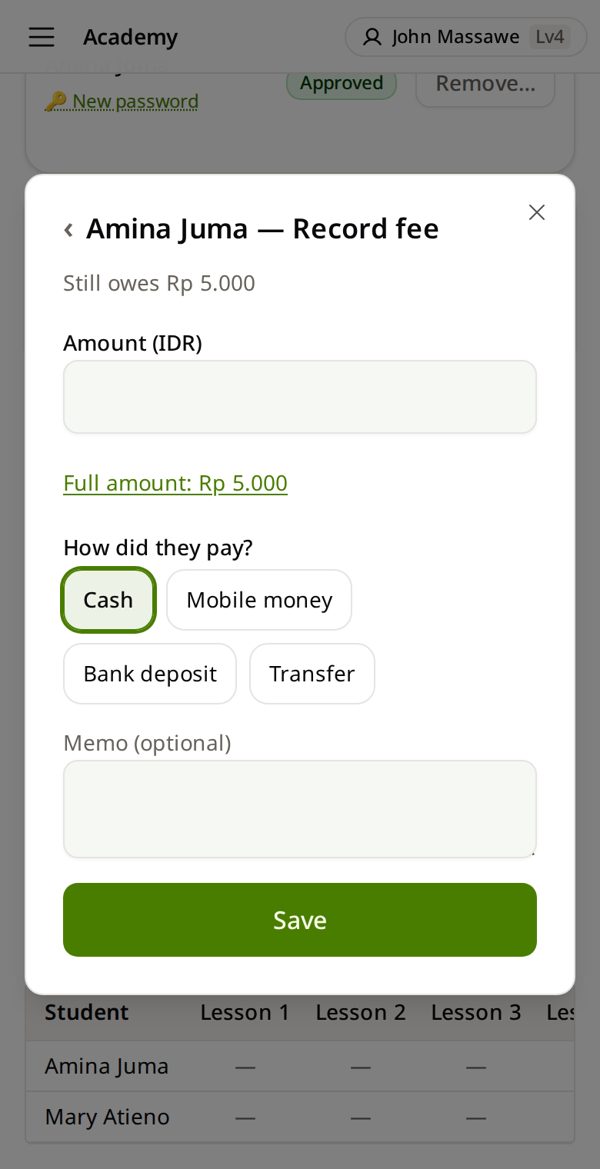
4. Amount · how they paid → Save
Part payment is fine. It is saved with today's date.
5. History → the receipt number 🧾
The student taps “Yes, I paid this” on the top card of their home page.
Do not keep the cash — hand it on the way your BEE office says. When your coordinator saves it as received, History shows ✓ (⏳ until then). Nothing for you to tap.
Give the online workbook — Your coordinator opens it
1. Requests → the student → Review → Online workbook
Or in your seminar room when you add a student: choose paper, online, or No textbook.
Requests ✳
Grace AchiengOnline workbook2. Waiting for coordinator approval
Your coordinator checks the fee and opens it. Record the fee in the seminar room first — then it can open at once.
Requests ✳
Grace AchiengWaiting for coordinator approval3. Rejected by coordinator? Read the reason
Fix it (for example, record the fee), then tap Online workbook again — it goes back to your coordinator.
Requests ✳
Grace AchiengRejected by coordinator — Send the receipt first
Online exam — Open a unit exam, close it, grade it
1. Academy → My Seminars → tap your seminar
Academy is a big tile on your home page. Your seminar room has everything for this seminar.
2. Tap Online Exam
One box per unit exam. Students with a paper book can take it too.
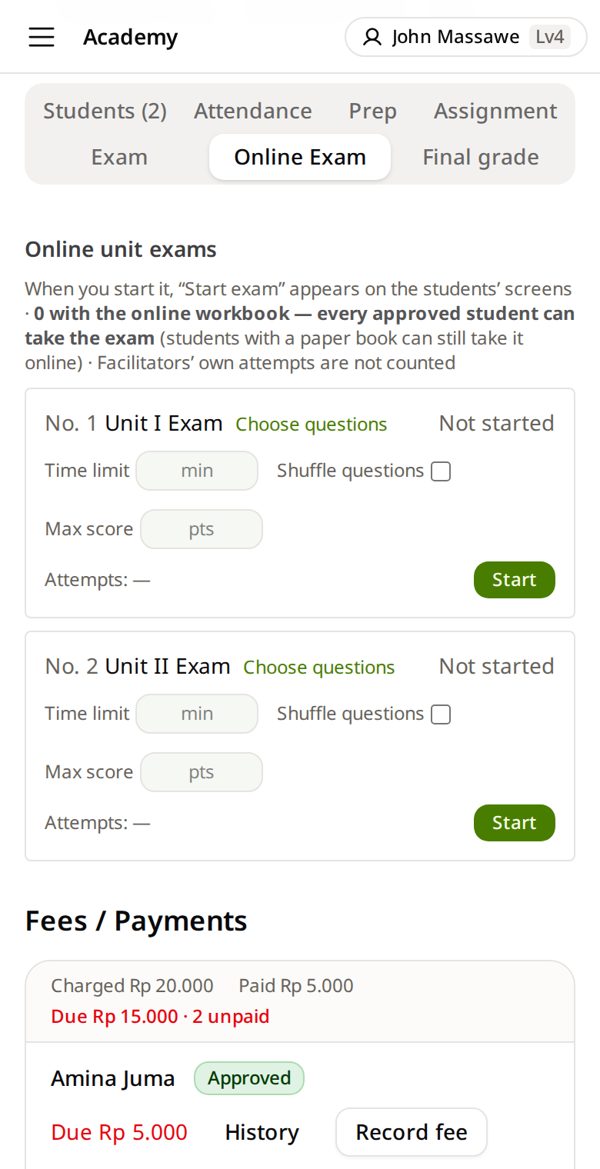
3. Time limit → Start
Students now see “Start exam”. Wrong one? Cancel opening — only before anyone starts.
Over the time limit: −1 point per minute.
4. Time is up → Close
A late student? Reopen — answers already sent stay locked.
Unit I Exam ✳
In progress12 / 10 / 0 — started / submitted / gradedClose5. Answers & grading → → read → Confirm
Choice questions grade themselves. Read the written answers. Run AI first pass only suggests.
Unit exam grading ✳
Grace AchiengAnswered 20/20 · Auto-graded 14/16 correctFinal score42Confirm
Grades and finalize — On the last day
1. Academy → My Seminars → tap your seminar
Academy is a big tile on your home page. Your seminar room has everything for this seminar.
2. Tap Final grade → type the score in Final score (0–100)
One number (0–100). Tap outside the box — if it asks, tap Confirm, or the score is not saved.
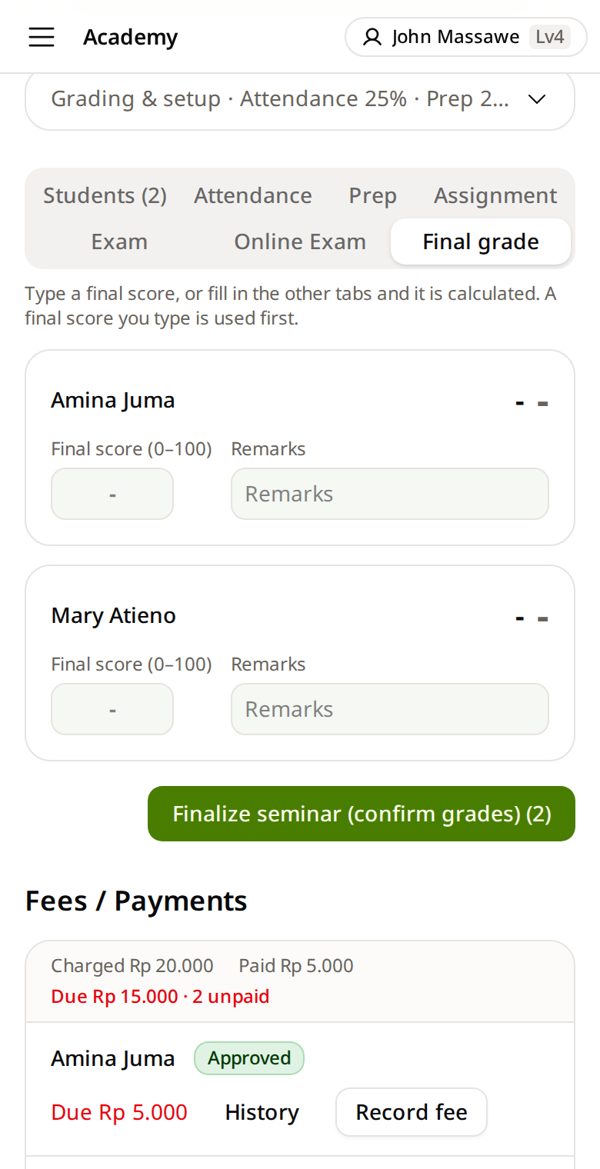
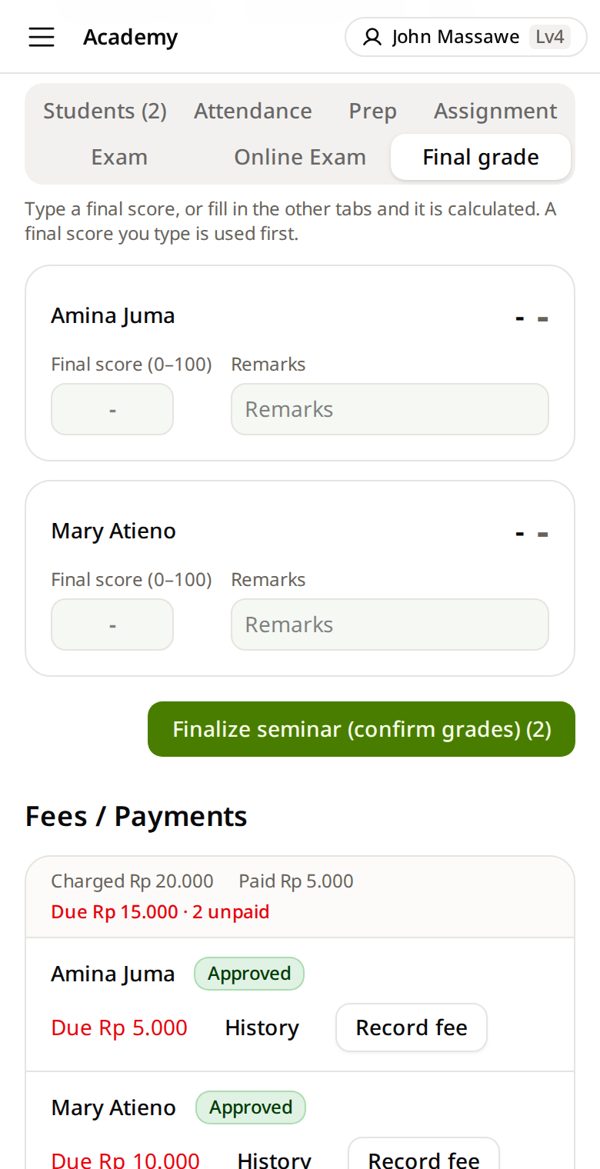
3. Tap Finalize seminar (confirm grades)
Every approved student becomes Completed. The coordinator checks it after you.
Someone dropped out? First: Students → Remove… → Remove (if it asks: Mark as dropped out).
An expense — Money you spent, with the receipt
1. Finance → Add an expense
The line above says who checks your entries.
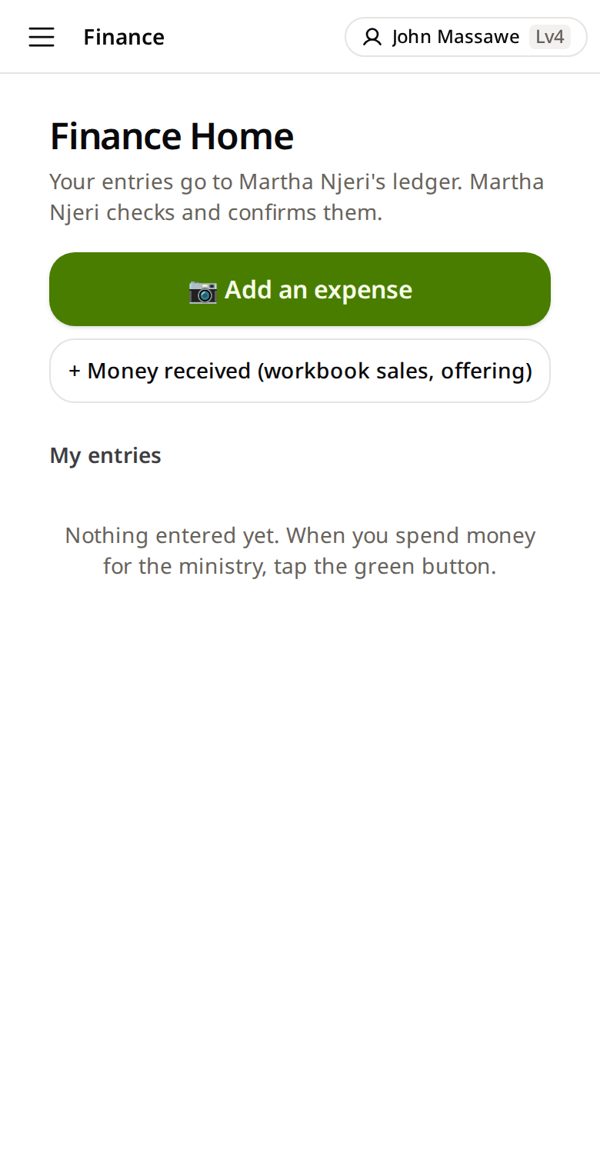
2. Take the receipt photo → Next
It reads the amount and date for you. No receipt? Tap No receipt — next — still record it, and talk with your coordinator.
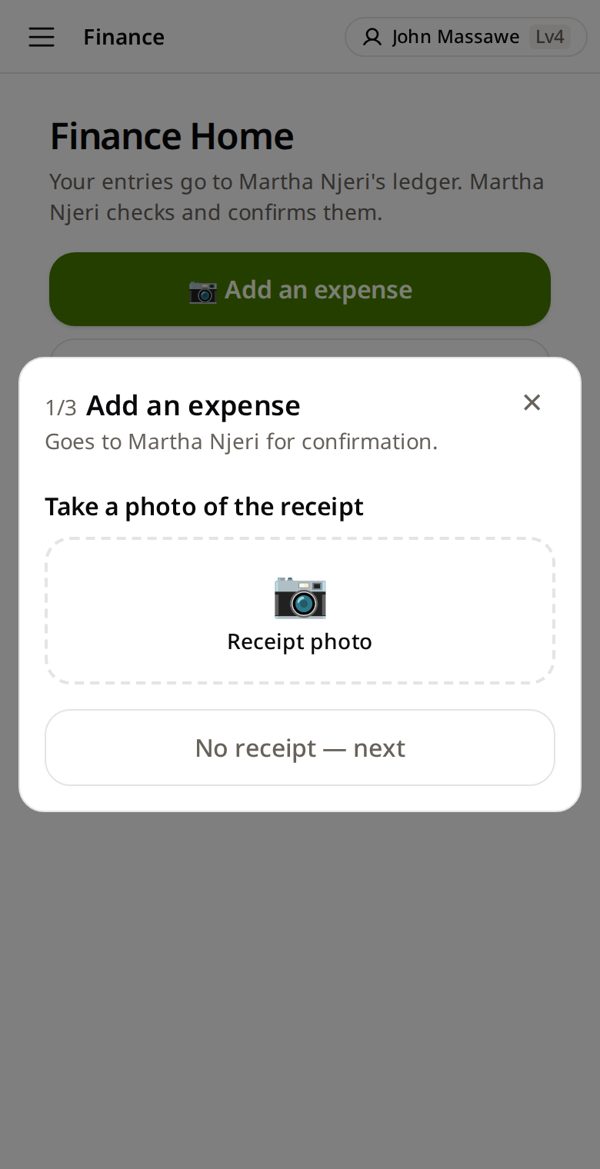
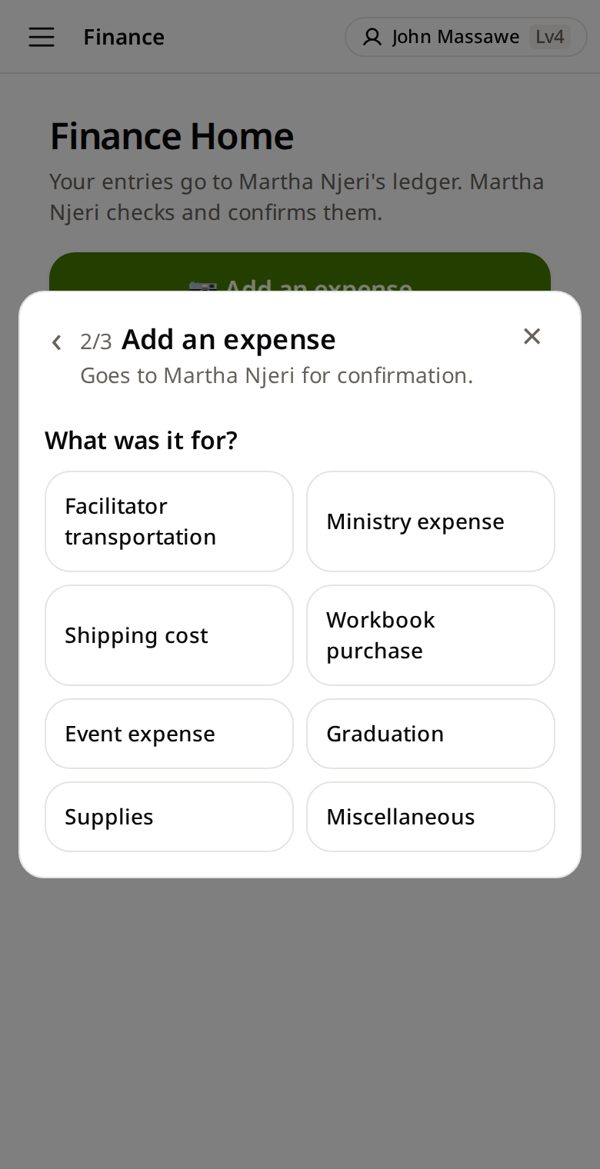
3. What was it for? → tap one
It goes to the next step by itself. ✨ from the receipt = what the photo suggests.
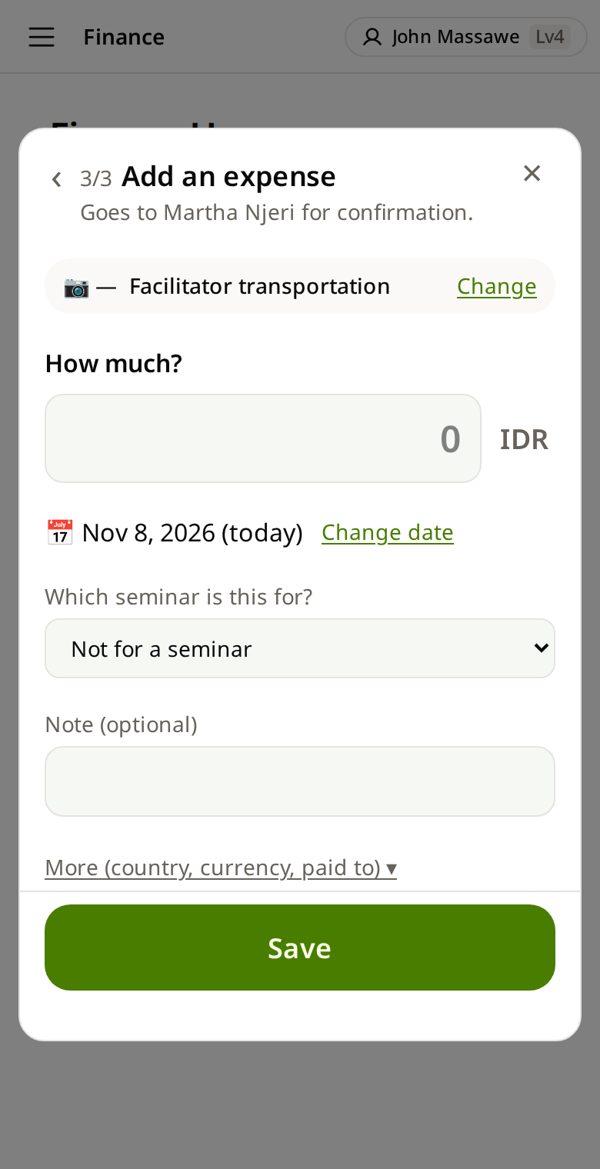
4. How much? → Save
Write which seminar in Note (optional), below How much.
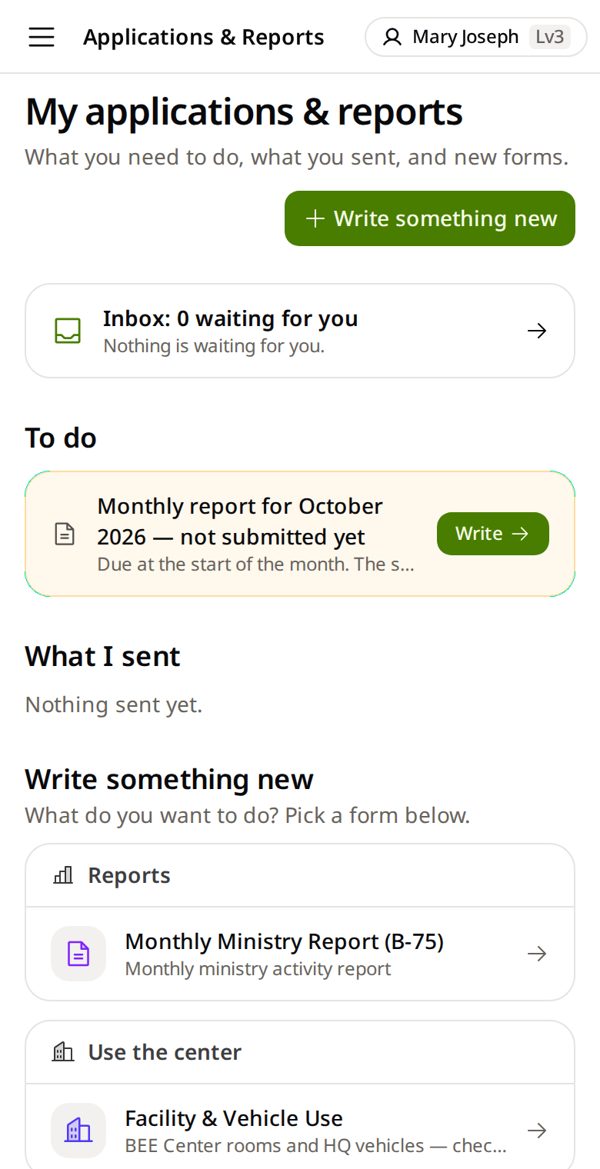
Monthly report (B-75) — BEE missionaries only — at the start of every month, for last month
1. Applications → Write
Only BEE missionaries send it. No “Monthly report” in To do? Then you don't send one — your seminar records are your report.
2. Pick the month — your seminars are already counted
Last month is already selected. Something left? Tap that line and fix it first.
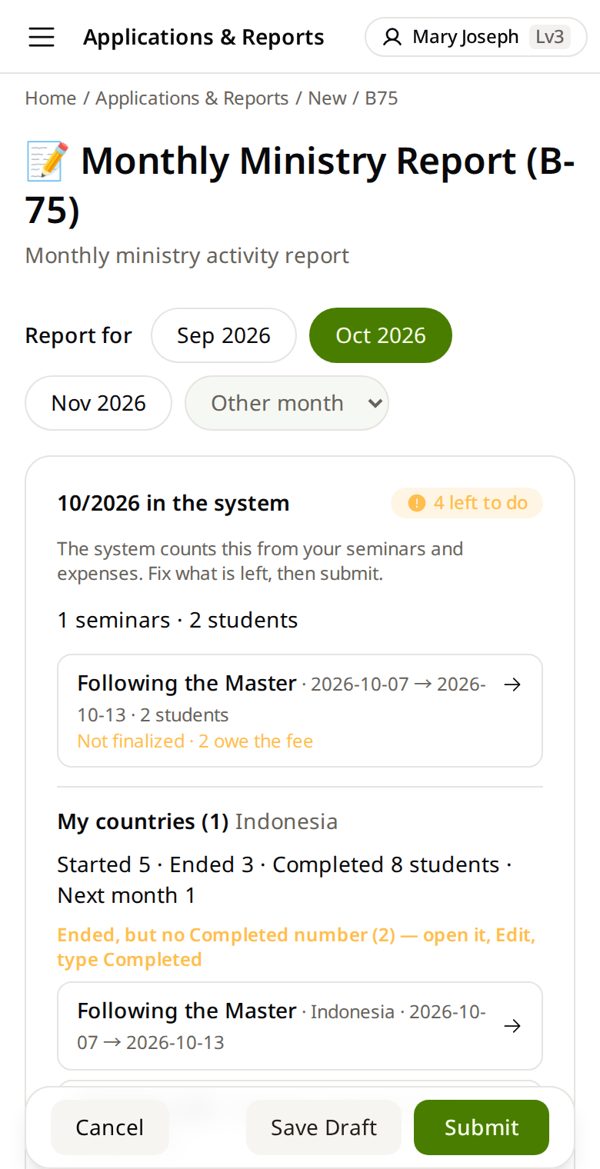
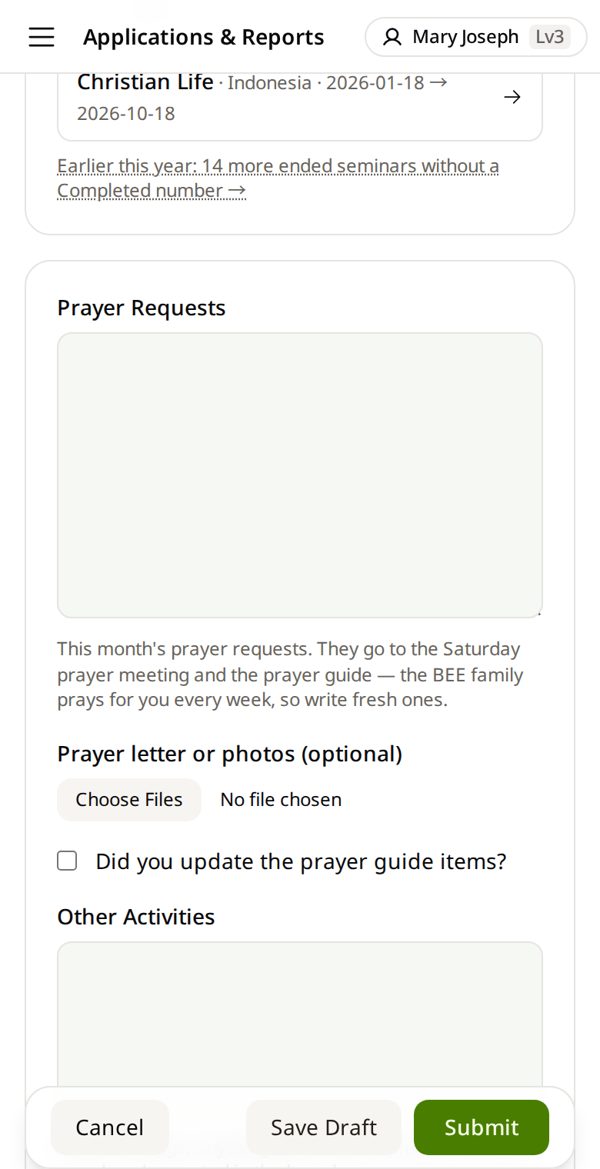
3. Write Prayer Requests → Submit
By person or place — praise and prayer, fresh every month. Other boxes are optional. Not finished? Save Draft.
🗓When to do what
- Before it starts → Open a seminar
- First day → Add students
- Every lesson → Attendance · money → Student fee
- After a unit → Online exam
- Last day → Grades and finalize
- Start of each month → Monthly report (BEE missionaries, for last month)
🔑A student forgot the password
Students tab → New password on their card → give them the new one.
📱Send the apply link
Top of the seminar room → Send apply link → share it on WhatsApp.
✏️Change the dates
Top of the seminar room → Edit schedule. The status follows the dates.
💵Money questions
- Use seminar money for lunch or transport? Talk with your coordinator first.
- No receipt? Still record every expense. Then talk with your coordinator.
- The fee looks wrong? It is set for your country already. Ask your coordinator — do not change it yourself.
👥Many students paid on one day
Record each student: Record fee → The student paid → tap the full amount link → Save. Each one gets a receipt number. Your coordinator can also record money you hand on as one group.
📵A student has no phone
The receipt number is the record. Write it on paper for the student. Later, when they sign in themselves, “Yes, I paid this” waits on their home page — nobody can tap it for them.
🧾Which button for an expense?
Not sure? Pick the closest one and write what it was in Note (optional) — e.g. “lunch for 12 students, Romans seminar”. The person who checks it can change the button.
📖Words you will see
- Coordinator = the BEE person for your country. Ask them about money and levels.
- Ledger = the money book your entries go into. Its owner checks them — the name at the top of Finance.
- Finalize = the last step of a seminar: grades are locked and the coordinator checks them.
💻Using a computer?
- Button and box names are the same as in the pictures.
- The menu is always open on the left — where the guide says ☰, use the left menu.
- Lists show as wide tables. Keep this guide open on your phone beside you.
I typed a wrong amount
Do not delete. The same day: History → Reverse on that line → write why → record the right amount. After 24 hours ask your coordinator.
I can't find the student
Search shows your country only. Not there? Use + New student (create login).
I enrolled the wrong person
Before you finalize: Remove… on their card in your seminar room.
My seminar is not in My Seminars
You are not its facilitator yet. Ask your coordinator.
I spent money, but where is the button?
Spent = Finance → Add an expense. A student's fee = the seminar room, not Finance.
A student stopped coming
Seminar room → that student's card → Remove… → Remove (if it asks: Mark as dropped out). Their attendance and grades are kept.
I don't see “Monthly report”
Only BEE missionaries send it. Keep your seminars, students and money up to date — that is your report.
The number of students looks wrong
Students counts waiting, approved and completed students — the small line beside it shows how many of each. Open Dropped out · cancelled at the bottom: each name shows who removed or cancelled it and when. When you finish the seminar, the app asks what to do with students who have no attendance and no grade.
A student cancelled by mistake
You will see it in Notifications → Students who cancelled themselves (last 7 days). Add the student again with the search in your seminar room. If a payment or grade is already recorded, ask your coordinator.